
Email automation is one of the widely used automation processes and in this article, you can learn about how to read data from excel, send an email, read from the inbox and extract data.
Overview
This article explains how to read the data from an excel sheet and send that data over an Outlook mail. Once the email is sent, it will be read from the inbox and extract information from the body.
Content is then stored on a datastore to make a consolidated report file. We can then use the consolidated file as a source file for future projects.
This is mainly used in cases where approvals are processed over email during the maker checker process. Ok, guys! Let’s dive into the whole process.
Sending An Approved Email
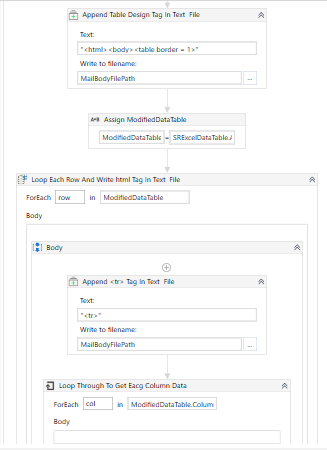
Read the input excel file using Read Range activity in UiPath and it returns the data table.
By using For Each activity to read each row of the data table and write those details in HTML format to create an HTML template for the email body.
Create HTML Template
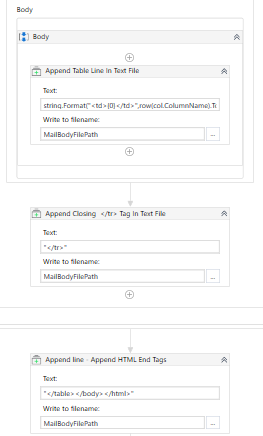
Create a text file and write the tag in the text file using AppendLine activity and append the opening row tag
in the same text file. Loop all the rows and columns and put each column’s data inside the standard table cell tag
. It will create a data table like excel. Below snippet helps you to create each column as a data table standard cell. Use this snippet in AppendLine activity.
Finally, close all the opened html tags using AppendLine activity in the same text file.
string.Format("
{0} ",row(col.ColumnName).ToString)Here is how the HTML template might look.
Creation of HTML Template screenshotsAfter the creation of an HTML template, install the Mustache.Activities.UiPath plugin in your project. It creates an HTML body for your email.
In our case, pass the text file path in TemplatePath property and it will create the email body.
Otherwise, you can create your own style mail body using the following snippet
{{#items}} {{name}} is awesome.{{/items}}. Pass this snippet in TemplateString property.Mustache.Activities.UiPath plugin returns the output as a string value.
Users can create the HTML mail body without any struggle by use of Mustache.Activities.UiPath.
Use SendOutlookMailMessage activity to send an email to your manager. Pass the output string value from Mustache.Activities.UiPath to email body property.
Enter receiver mail id and subject of the mail like SR Details Report.
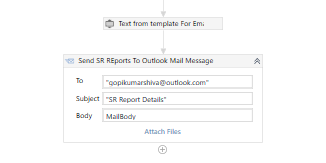
1. Mustache Plugin Activity 2. Send Outlook Mail Message Activity
You will receive the email that the bot sends in your Outlook inbox.
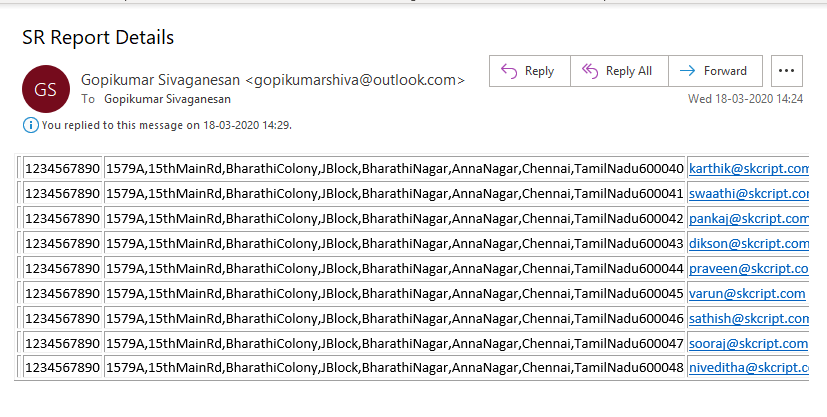
Sample mail using HTML template text file
Receiving An Approved Email
The bot will now continuously monitor the outlook mailbox using a scheduled process to serif any Approved or Rejected emails were received.
The Approved and Rejected mail message format looks something like this.
Reply Message Format: Approve 1,2,3,4,5 and Reject 6,7,8,9
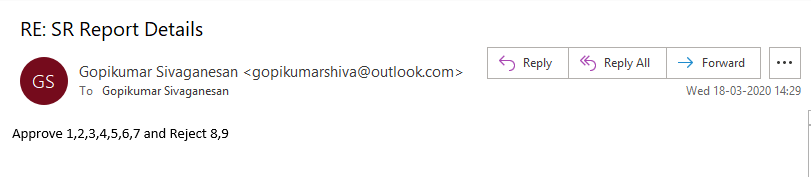
Format of Approve and Rejected Message
Use Get Outlook Mail Message activity to read all the approved and rejected mail messages based on the mail subject.
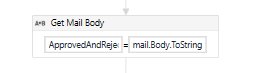
Get ApprovedAndRejected Mail Body Message
Loop all the messages using ForEach activity and get the approved and rejected email message body using mail.Body.
We have to extract the approved and rejected values by using RegularExpression (Regex). Here we have to get the values after “Approved” and before “and” text.
Below, I attached the Regex value that I used to extract that report values.
Regex value to extract Approved values:
(?<=Approve)([^and]+)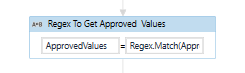
Regex value to extract Rejected values:
(?<=Reject).+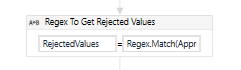
Write the extracted approved and rejected value in a text file and save it for future use.
Extract the list of reports after “SR Report Details” text from the email body using the RegularExpression (Regex).
Regex value to extract Reports value:
(?<=SR Report Details)(\s+)</em>[^""]*$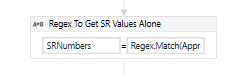
Loop all the extracted reports and ordered by serial number and write it on the same text file.
Remove commas from approved values and convert them into an array and loop it.
It will return values like this: {“1”,”2”,”3”,”4”}
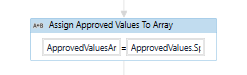
Convert Approved Values To An Array
While looping an approved value, check if the value is “1”. Extract the first value from the text file before we save. It will continue until the approved array is null.
Regex value to extract Reports value depends on array value:
?<="+ApprovedValue+" : ).+Using GenerateDataTable to store those approved values as a data table.
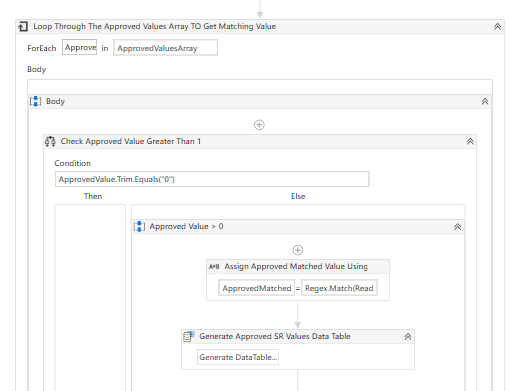
Image for Step 8 and 9 Process
Repeat the 6,7 and 8 steps again for rejected values as well.
After splitting the approved & rejected report values, store it in a database and it is used as an input file for future processes.
For more information about process refer the following video
Up next
The only WFH productivity hack you need! Skcript
/svr/automating-the-email-approval-process-with-uipath/
/svrmedia/heroes/automating-the-email-approval-process-with-uipath.jpg
Skcript
/svr/automating-the-email-approval-process-with-uipath/
/svrmedia/heroes/automating-the-email-approval-process-with-uipath.jpg
Book a free consultation
Book a time with our consultants to discuss your project and get a free quote. No strings attached.