
At hellonext we recently built an Intercom Integration for recording feedback directly from the Intercom Inbox. It made collecting valuable feedback from potential customers easier without juggling between browser tabs and applications to record it. In this blog post, I’m going to show you how to build one from scratch.
At hellonext we recently built an Intercom Integration for recording feedback directly from the Intercom Inbox. It made collecting valuable feedback from potential customers easier without juggling between browser tabs and applications to record it. In this blog post, I’m going to show you how to build one from scratch. We’ll learn from OAuth to a fully functional Intercom Inbox App. I’ll be writing the app with Ruby on Rails. What are you waiting for? Let’s get started.
The Problem
Let’s assume you own a business & have an application that records feedback from customers. The app functionality will be to record, list all feedback and show them with additional details. This application has a form which is used to submit feedback manually by you. You collect the feedback from the customer from Intercom, switch to this application and record it. It’s that hard. Our goal is to say “It’s that easy” at the end of this blog post. To achieve this, we’ll just move the form from our application to Intercom.
Application Setup
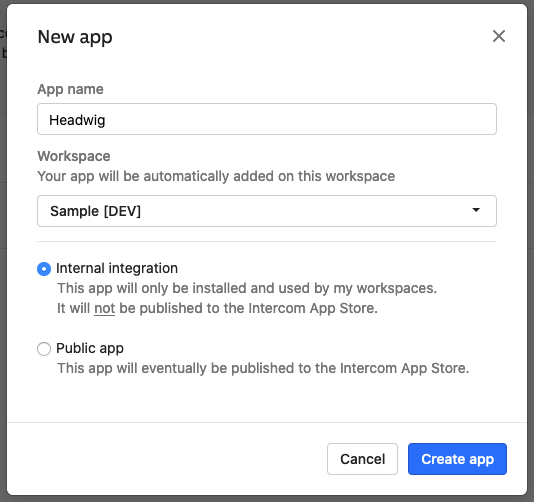
Our application is now called this, let’s instead call it Headwig. Our application has the following initially,
I’ll fast forward now and we’ll meet at the Intercom Integration.
Intercom Integration
To solve our problem, we need to bridge the Rails application with your Intercom’s workspace. Sounds good but how do we do it? Authorize with OAuth. With OAuth, you’ll authorize hedwig to get your information about your Intercom Workspace. Let’s go ahead and do that! Let’s create an application:
Connect with Intercom
So, how is this going to work? You’ll authorize the Rails application with Intercom, after authorization, Intercom will ping our application with a code param. With that code param, we’ll make a request to Intercom’s Eagle endpoint to get the access token. So, we now have the access token which will be mapped to the user. Ta-da! It’s done. Let’s write some code now.
Add intercom
Add the following to your Gemfile and do bundle install.
gem 'intercom'
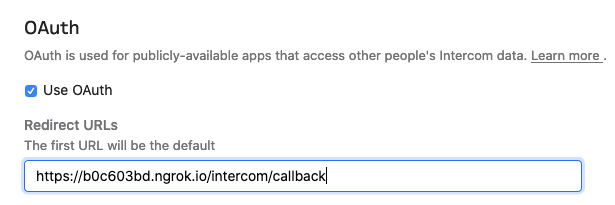
Enable OAuth
Enable OAuth for your Intercom App and let’s configure a callback url. This will be the url to which Intercom will ping us with the code param. Use ngrok to expose your local port to receive requests from Intercom.
Connect with Intercom
We’ll connect our application with Intercom with a request to https://app.intercom.io/oauth with the client ID as one of the parameters. You can find the client ID in the ‘Basic Information’ of your Intercom Application. You also need the Client Secret later, so make sure you have that too. We’ll also have a ‘state’ param which by definition will be used to restore the previous state of your application. In our case, we’ll send in the current user id to determine who authorizes and with whom we should map the access token to. Usually, we need to encrypt the state params but for this tutorial I’m not going to do that. It’s best practice to encrypt the state param to not reveal any meaningful data to a third party.
In the view, we’ll have a Connect with Intercom button so that the user can initiate the authorization process.
<%= link_to @intercom_oauth_url do %>
	<img src="https://static.intercomassets.com/assets/oauth/primary-7edb2ebce84c088063f4b86049747c3a.png" srcset="https://static.intercomassets.com/assets/oauth/primary-7edb2ebce84c088063f4b86049747c3a.png 1x, https://static.intercomassets.com/assets/oauth/primary@2x-0d69ca2141dfdfa0535634610be80994.png 2x, https://static.intercomassets.com/assets/oauth/primary@3x-788ed3c44d63a6aec3927285e920f542.png 3x"/>
<% end %>

In the above code, the @intercom_oauth_url generated from a function written in /lib/intercom_int.rb as following,
def get_oauth_url(user)
	"https://app.intercom.io/oauth?client_id=#{CLIENT_ID}&state=#{user.id}"
end
As we discussed earlier, we have the Client ID and the State (user id) as parameters.
We’ll test it out. After clicking the button, it redirects to the authorization page as follows,

After authorizing our application, Intercom will make a request to the callback URL we specified when we enabled OAuth. But what happens after that? To be honest. Nothing. It’s because we haven’t handled it - yet.
Authorize
After the callback, we’ll get the code parameter from Intercom and we also get back the state parameter which we sent with the OAuth call. We’ll now need to get the access token for the authorized user. To do so, we’ll use the code parameter, make a request to Intercom’s eagle endpoint https://api.intercom.io/auth/eagle/token using the httparty gem. We also send the Client ID, Client Secret & Code as parameters. This endpoint will respond with the access token if everything with the request is good. We’ll then map the access token with the user id that we get as the state parameter.
# Callback for Intercom OAuth
 def callback
   user = User.find_by(id: params[:state])

   # Authorize
   if user.present?
     IntercomInt.set_access_token(params[:code], user)
   end

   redirect_to root_path
 end
This will also make a request to the eagle endpoint like the following, we’ll get the access token as the response which needs to be stored in the database and mapped to the user.
# Get access_token from Intercom API using the code we got during callback
 def get_access_token(code)
   HTTParty.post(
     EAGLE_ENDPOINT,
     body: {
       client_id: CLIENT_ID,
       client_secret: CLIENT_SECRET,
       code: code,
     }
   ).parsed_response
 end
Intercom App
We’ve authorized our app with OAuth. So, what’s the next step? To create an Intercom application. This is where Intercom have done a great job by building something called the Canvas Kit. You can design your app with the Canvas Kit. We’ll discuss more in this section.
Canvas Kit
The canvas kit will allow us to build apps that work on the Intercom UI. There are two fundamental requests which are ‘initialize’ and ‘submit’.
The initialize request is is called when,
- Adds your app into to a conversation reply (Messenger)
- Adds your app into an Operator flow (Messenger)
- Adds your app into a Message (Messenger)
- Adds your app on to the Messenger Home (Messenger)
- Adds your app to the conversation details (Inbox)
- Switches conversations when your app is present in the conversation details (Inbox)
The submit request is called when a component with a submit action is interacted with (Messenger, Inbox)
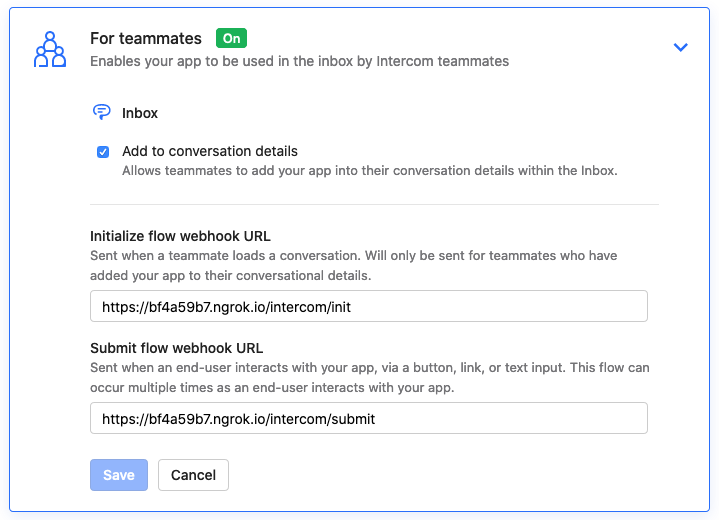
Both of the requests will come to our application which should be handled. So, we’ll create two endpoints to serve this purpose. To tell Intercom, what endpoint to ping, we’ll specify it in the Canvas Kit section of our application as follows,
Canvas Initialize
For the initial request, we’ll serve a form component to Intercom with which we can submit feedback from Intercom.
# Initial component render for inbox app
def init
  @intercom_int = IntercomInt::Inbox.new(
    authorization: @authorization
  )
  render json: {
    canvas: {
      "content": {
        "components": @intercom_int.initial_component
    }
    }
  }
end
There’s a function in function in lib/intercom_int/inbox.rb that returns the following structure,
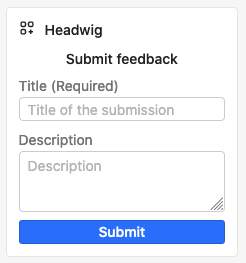
# Initial & Default component
def initial_component
  [
    {
      "type": "text",
      "text": "Submit feedback",
      "style": "header",
      "align": "center"
    },
    {
      "type": "input",
      "id": "title",
      "label": "Title (Required)",
      "placeholder": "Title of the submission"
    },
    {
      "type": "textarea",
      "id": "description",
      "label": "Description",
      "placeholder": "Description"
    },
    {
      "type": "button",
      "id": "submit_feedback",
      "label": "Submit",
      "style": "primary",
      "action": {
        "type": "submit"
      }
    }
  ]
end
Now, for our Intercom application, this will result with the following UI Component,
Canvas Submit
The Intercom submit request will have the form parameters with which we can create a database record for our feedback application.
# intercom_controller.rb
def submit
  components = @intercom_int.submit_feedback(params)

  render json: {
    canvas: {
      "content": {
        "components": components
    }
    }
  }
end
# lib/intercom_int/inbox.rb
# Record the feedback submitted from the Intercom app
def submit_feedback(params)
  post_params = {
    title: params.dig(:input_values, :title),
    description: params.dig(:input_values, :description),
    intercom_conversation_id: params.dig(:conversation, :id)
  }

  # DB Operations
  submit_feedback_from_intercom(post_params)
end
We can also store the conversation id from which the feedback was received with which we can build an url to quickly navigate to the conversation.
We now have an Intercom application that works in the inbox. This can now be used to record feedback directly from Intercom. Intercom apps are very handy and they can be developed by anyone! Check it out and let me know.
P.S., Intercom messenger apps are also very popular and useful. In my next series, I’ll write about that!
Up next
Transforming Accounts Payable Processing using RPA