Earlier RPA bots used to have some limitations like it would take structured data for processing from excel, database, etc. But as we know most of the data in today’s world are in unstructured format and RPA bots were not able to operate on these data. But with advancements in technology like OCR (Optical Character Recognition) and Machine Learning, RPA bots are capable of extracting these data and store them as structured data using these technologies.
Robotic Process Automation has helped many business professionals to automate their repetitive tasks and concentrate on the productive task. These bots work as digital workers on the application user interfaces and mimic the actions.
But, these bots used to have some limitations like it would take structured data as input for processing the tasks. But in today’s world, most of the data are in an unstructured format. Thanks to advancements in automation; now these bots use technology like OCR (Optical Character Recognition) and machine learning to extract data from the invoices, pdf, and image and store them as structured data. So that bots can process these data.
In this article, we will learn how to use these technologies and extract data using Document Understanding in UiPath.
Structure of Document Understanding and how it works
Document Understanding integrates RPA and AI to automatically process the documents. It allows us to automate the complex processes. It can be used to process documents.
- Various structured documents like forms
- Less structured documents like bills, invoices, receipts (including the ones with tables)
- Handwriting, signatures, and checkboxes
- Different file formats such as PDF, PNG, GIF, JPEG, TIFF, etc.
- Skewed, rotated, unrelated, or low-resolution scanned documents
Document Understanding framework
We need to follow certain steps to extract data from these documents like
- Load taxonomy - define the structure of the documents and data to be processed using the Taxonomy Manager.
- Digitize document – use one of the available optical character recognition (OCR) engines to digitize the text; you can even use your own OCR
- Classify document – classify the documents using different types of classifiers.
- Extract document – choose the most suitable extractors according to your document type.
- Validate document – Humans can check the data to confirm the extracted data or handle exceptions.
- Export extracted data - send the extracted info for further usage, for example, to email, excel spreadsheet.
Understanding Document Processing with Example
Let’s understand how document understanding works with one example
Here, we will be using 4 documents for extracting the data from it
- Scanned Invoice
- Receipt Image
- Pdf Document
- Screwed Image
Start a new Process and name it “ExtractDataWithIntelligentOCR”
Now we need to download the intelligent OCR package as it is now available by default.
Click on Manage Package ->All Packages and search for intelligent OCR activities and install it.
We will be using the OmniPage OCR engine, so install these packages too.
We will be using Flowchart as a container, so drag one flowchart.
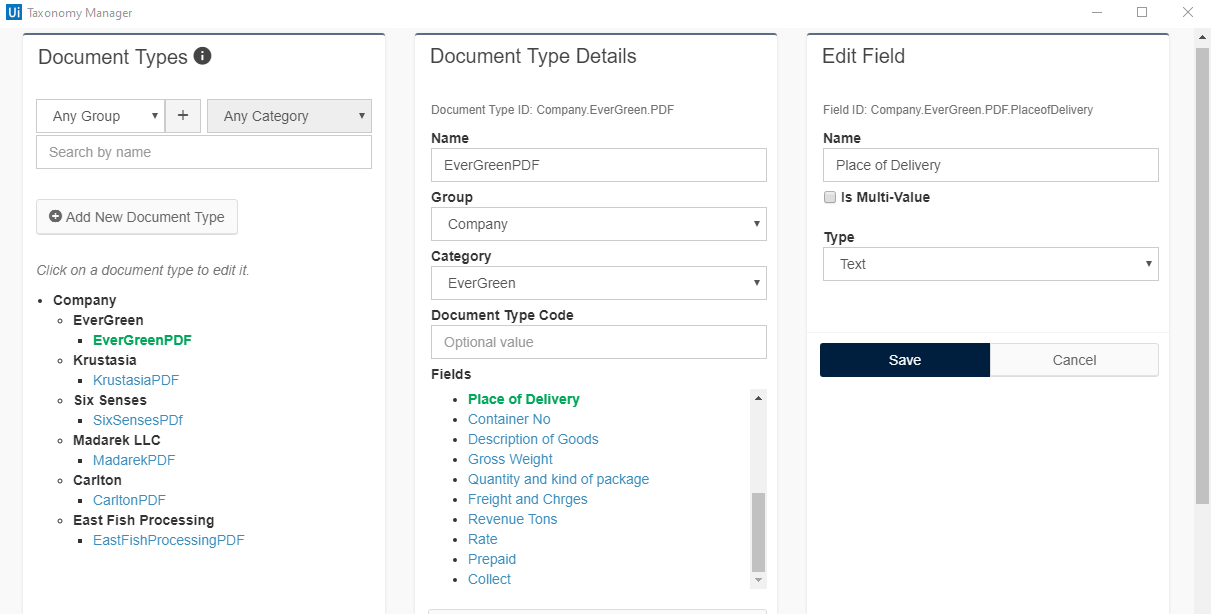
Now we need to define the structure of our document i.e., which fields we need to extract.
Taxonomy Manager
So click on Taxonomy Manager from the designer pane.
- Create a new Group and new Category and click on “add new document type”.
- Give the name of the document and click on “new field” to add the name of the field which you want to extract.
Add as many fields as you want.
Follow similar steps for all the documents. Later, performing all the steps it looks as below.
Now drag the Load Taxonomy activity and assign it a variable.
We need to take each file from the folder, process them, and store the output in an excel file in another folder. So for getting all the files from the folder we will store it as a variable.
Create one variable of string[] and name it as files.
Drag one assign activity and write the following code to it.
Files = Directory.GetFiles(FolderPath)
Now we need to process all the files present in the variable “Files”.
So for this, we will be using for each loop.
Drag one for each loop activity. In the value, section pass Files and change TypeArgument as String.
Inside the body of each loop drag one flowchart activity.
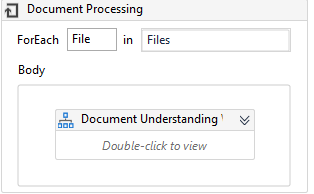
Inside this, we need to design the document understanding framework.
We need to get the fileName of each document for our reference.
Drag one assign activity and pass the following code.
Filename = Path.GetFileNameWithoutExtension(File)
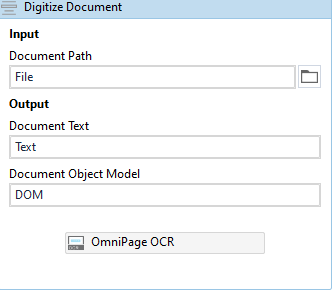
Digitize document
Drag one Digitize document activity and assign all the required variables and in the OCR place drag OmniPage OCR.
Classify Document
Drag one Classify Document Scope activity and assign all the required variables and we will use Keyword Based Classifier.
In the manage, learning enters the keyword-based on which you want to classify documents.
Create one json file and pass the created file path as the learning path.
In the configure classifier check on the checkbox.
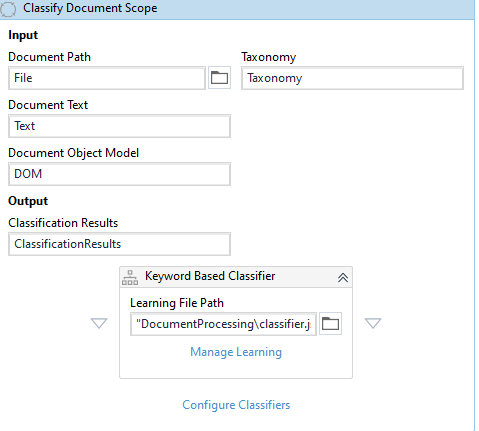
Now we need to check whether the document got classified or not.
So for this, we will use FlowDecision activity.
In the condition write the following code.
ClassificationResults.Any
Connect True part to Data Extraction Scope and False part to Log Message.
Data Extraction Scope
Now we need to extract the data from the document.
Drag one Data Extraction Scope activity and initialize all the variables.
We will be using a Form-Based Extractor for extracting the data.
We need to get the API key from the orchestrator.
Login to the orchestrator
Click on admin -> Licenses -> Other Services -> Under Document Understanding -> Click on Generate new -> Copy the API key.
Paste the copied API Key in the API key field under Form Based Extractor.
Click on Manage Template -> Create Template
In the create Template Window
- Click the document type from the dropdown.
- Name the template.
- Specify the template path for which you want to extract data.
- Select the OCR engine as OmniPage.
- Click on the configure.
Template Manager Windows Opens
- For each page, we need to identify 5 fields. For specifying the 5 unique fields click on the fields by pressing the Ctrl key.
- Identify each field that you defined in the taxonomy manager.
- Save the form.
Click on Configure Extractors and check on the checkbox.

Present Validation Station
Now we need to validate whether the extracted data is correct or not.
Drag one try-catch activity inside try to place the Present Validation Station activity and initialize all the variables.
In the catch section drag, one assigns activity and creates one variable ValidateException of boolean type and assigns value as True.

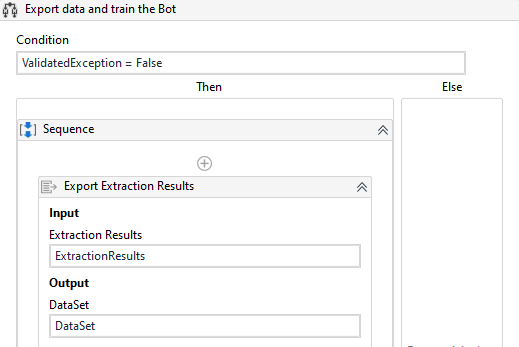
Export Extraction Results
Drag one of activity in the condition pass the following code
ValidatedException = False
Inside Then condition of IF
Drag one Export Extraction Results and initialize all the variables.
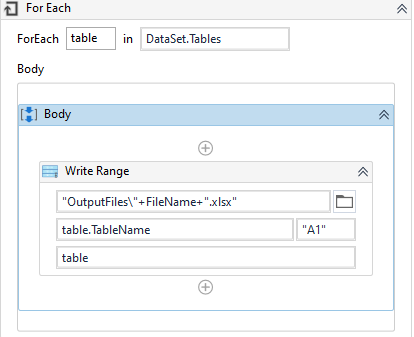
Drag one For each activity in the value field set the values extracted from Export Extraction Result and in the TypeArgument set value as System.Data.DataTable.
In the Body of For each
Drag one Workbook write range activity
- In the path pass “OutputFiles”+FileName+".xlsx"
- In the sheetName pass table.TableName
- In the DataTable pass table
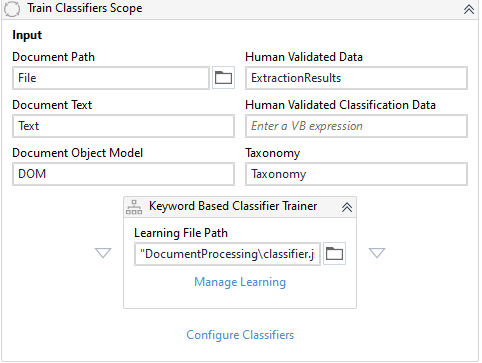
We will train our model so that if for some reason it couldn’t classify the document for the first time then it will remember it and classify the document if we run the bot again and again. So it will get better as many times we run it.
Under reading range Drag one Train classifier Scope
Initialize all the variables Drag one Keyword Based classifier Trainer
- In the file, path pass the json file path which we created for the classifier document scope
- Check on the checkboxes under Manage Learning and configure classifier.
Now our workflow is ready and it looks like this:

Now run the workflow and see the extracted results in the specified folder.
Hope you find the article useful and informative.
Please feel free to contact us for any query related to RPA or document understanding at [email protected].
Happy Automation ☺.
Up next
Why is Mental Health one of the Important Issues to Address? Skcript
/svr/process-documents-using-artificial-intelligence-for-rpa-bots/
/svrmedia/heroes/process-documents-using-artificial-intelligence-for-rpa-bots.png
