

A tutorial on how to set up a Raspberry Pi to control LED lights in minutes.
Recently, I had a chance to play around with Raspberry Pi 3. The first thing I did was to try and control a LED light using RPi. Let me explain how this works, so that you can try this at home.
This post will guide you through the process and following are the prerequisites.
- A Raspberry Pi which you can buy here : https://goo.gl/Y8iMAQ
- Download the operating system, I prefer **Raspbian **since it’s the official one (https://www.raspberrypi.org/downloads/)
- A SD Card for RPi 3 get 16GB Class 10microSD
Ok, so once everything is ready it’s time to jump into the game.
Step 1
Burning the Raspbian image to the SD Card is the first thing to do. For this you can use the following
- Win32 Disk Imager for windows
- This Tutorial for linux and mac
Step 2
Once the SD card is ready with the operating system, insert it to Raspberry Pi and boot. And also connect the Pi to your modem via Ethernet, (WiFi can also be used)
Now you can ssh into RPi with the IP address of Pi which you can find from model status page.
ssh pi@ipaddress
Your default username for Pi will be pi and the password will be raspberry. if the authentication is successful it’ll take you to your Pi’s console.
Step 3
Now it’s time for setting up the libraries. For this tutorial you need a set of library to be installed which can be done with following commands
sudo apt-get install python-pip
sudo pip install flask
Above commands will install pip and flask in your Pi. pip is a package manager for python and flask is a python based micro web framework.
Step 4
Wiring the board will the next major task. Here we’re using the pin 7 for positive and negative terminal is grounded to ground pin of the Raspberry Pi. The wiring will be like the following diagram.
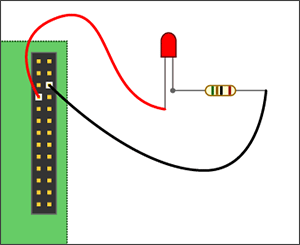
for more details about the pin configuration refer this website : https://pinout.xyz/
Step 5
The main task now is to create a simple web app with flask which handles the request and control the LED power supply.
First create a simple python file with following command
sudo nano simple_iot.py
And here is the code for achieving that. Copy paste it to the file.
from flask import Flask, render_template
from flask.ext.responses import json_response, xml_response, auto_response
import datetime
import RPi.GPIO as GPIO
app = Flask(__name__)

.route(“/toggle”, methods=[‘POST’])
def togle():
 GPIO.setmode(GPIO.BOARD) ## Use board pin numbering
 GPIO.setup(7, GPIO.OUT) ## Setup GPIO Pin 7 to OUT
 state = not GPIO.input(7)
 GPIO.output(7,state) ## Turn on GPIO pin 7
 return json_response({“status”: state}, status_code=201)

if __name__ == “__main__”:
 app.run(host=’0.0.0.0', port=80, debug=True)
Now time to run the server. You can run the server simply like a normal python app
sudo python simple_iot.py
Now open up your rest client like Postman or Advance Rest Client and raise a POST request to something like below. If everything works fine you’ll find status of the light returned and the light will toggle its state.
 A screenshot from Postman
This is a quick run through of Setting Raspberry Pi with WebServer to control LED.
Here is the github repo of all the source code: https://github.com/varun-raj/RaspberryPiFun
Up next
These are the only six tools you need to run your company